Building your own diorama
I am often asked how I build my model dioramas. On this page I will tell you how I do it, and hopefully give you tips on building your own.
How to build Moonscapes


Moonscapes
Moonscapes are one of the easiest dioramas to build. I build mine on baseboards which are approximately A1 (594 x 841mm) sized MDF, just less than 1cm thick.
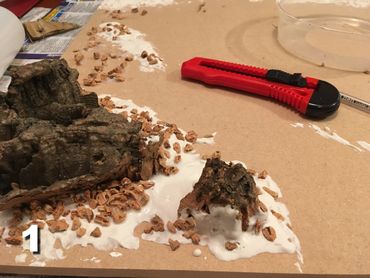
First, you will need some large pieces of cork bark (the large pieces seen on picture 1 above). I buy these from model shops where they are often sold to modelmakers to be "rocks" on model landscapes. However, you might be lucky and be able to find pieces of fallen trees that would be suitable - what you need are chunks of bark with a very textured surface. Glue these "rocky" pieces to the back or sides of your model set with copious amounts of wood glue, but expect the glue (depending on thickness) to take 24 to 48 hours to dry.
If you want more "hills" in between, use pieces of cardboard to cut contour shapes, in layers, with each piece that goes on top smaller than the piece below it (see top left of picture 2 above). Glue each layer down with wood glue. You might have to weight the cardboard down with something heavy, otherwise as the glue and cardboard dries out it can bend upwards and separate in places.
When the contouring is dry, use polyfilla to cover over the cardboard hills (picture 3). I buy pollyfilla as powder in boxes, and mix it myself in a disposable plastic container with water to a smooth "thick porridge" consistency which can be easily spread with an old knife, spoon or spatula. The stuff in the tubes will never be enough for your needs and will more than likely be too thick to spread easily over large areas quickly - which is what you need to do. Don't mix it to be too wet and sloppy, or it spills everywhere, including off your diorama. Depending on the area you need to cover, you will be making up several batches in succession. Spread it over your contours to hide the stepped effect of the cardboard - make slopes, but don't make them too smooth. Lumps and bumps are GOOD, so find a technique of tapping the polyfilla with whatever implement you use to create a rougher surface. Also, don't cover over your bark "rocks" - the detail on them is too good to cover up, particularly any cracks and crevices which add interest. (The round structure you see in my pictures was to create a flat raised circular area on which I planned to place a round shaped building - Moonbase Alpha's monitoring outpost).
Also, spread some polyfilla near to the cork bark "rocky" bits, and push into it some fine cork bark chips (see picture 1). Again, you can buy these in bags at model shops or online. These will resemble small broken rocks.
When all is dry, spray Spraymount glue over the flat areas of your model - avoiding the cork bark rocks and higher parts of any contouring. Then use a sieve to lightly sprinkle over it fine silver sand or terrarium sand. I got my first batch of this from a local pet store. Lightly cover all the spray-glued areas and let it dry for an hour or so until putting the board on its end and shake it or tap it to let loose sand fall off. If necessary, add Spraymount to any bare patches and sieve more sand onto it. Wait till dry and shake off the excess again.
Your last task is to spray the whole diorama with matt grey primer paint (picture 4).
Picture 5 shows this particular diorama completed, with the monitoring outpost building in place. The building was made from stout grey card, whilst the lighting inside it was created by putting a small LED light/torch inside the building.
Plan your diorama and the position of "rocks" with some in the background, but also some rocks in groups in your foreground. Picture 6 shows an example of some rocks in the foreground which add depth to the diorama scene.
If you make more than one moon diorama (as I have done), you can sometimes put the dioramas together to make larger sets.